
①Angular ngrx/storeを分かった気になってみる
Angular ngrx/storeをサンプルコードを書いて分かった気になってみましょう!!
この記事は アイソルートAdventCalendar2019 20日目の記事です。
こんにちは。
クラウドソリューショングループのokawa.mです。
今回はAngularの中でも質問がよくあるNGRXの基本中の基本
ngrx/storeについて書いていきたいと思います。
NGRXについては、アイソルートAdvent Calendar2019で生意気に2枠も使って解説していきたいと思います。よろしくお願いいたします!
①Angular ngrx/storeを分かった気になってみる ← この記事
②Angular ngrx/entityでよくあるCRUD操作を簡単に書いてみる ← 明日の記事
そもそもNGRXとは
Angularのためのリアクティブライブラリです。VueでいうとVuexと同じ立ち位置のライブラリです。
NGRXはReduxのデータフロー構造を参考に作られており、ReduxをAngularっぽく書けます。
NGRXを完全に理解しようとすると、まずReduxの概念を知らないといけないのですが、
今回は「わかった気になってみる」というタイトルですので、細かい説明は省きます。ご了承くださいませ。
とりあえず、サンプルコード書いてみて、わかった気になってみようという趣旨でございます。
NGRXのデータフロー(一応掲載)
- Component(EFFECTS)からACTIONをdispatch(発行)
- REDUCERがSTOREを更新
- SELECTORがSTOREのSTATEの一部をComponentにデータバインディング
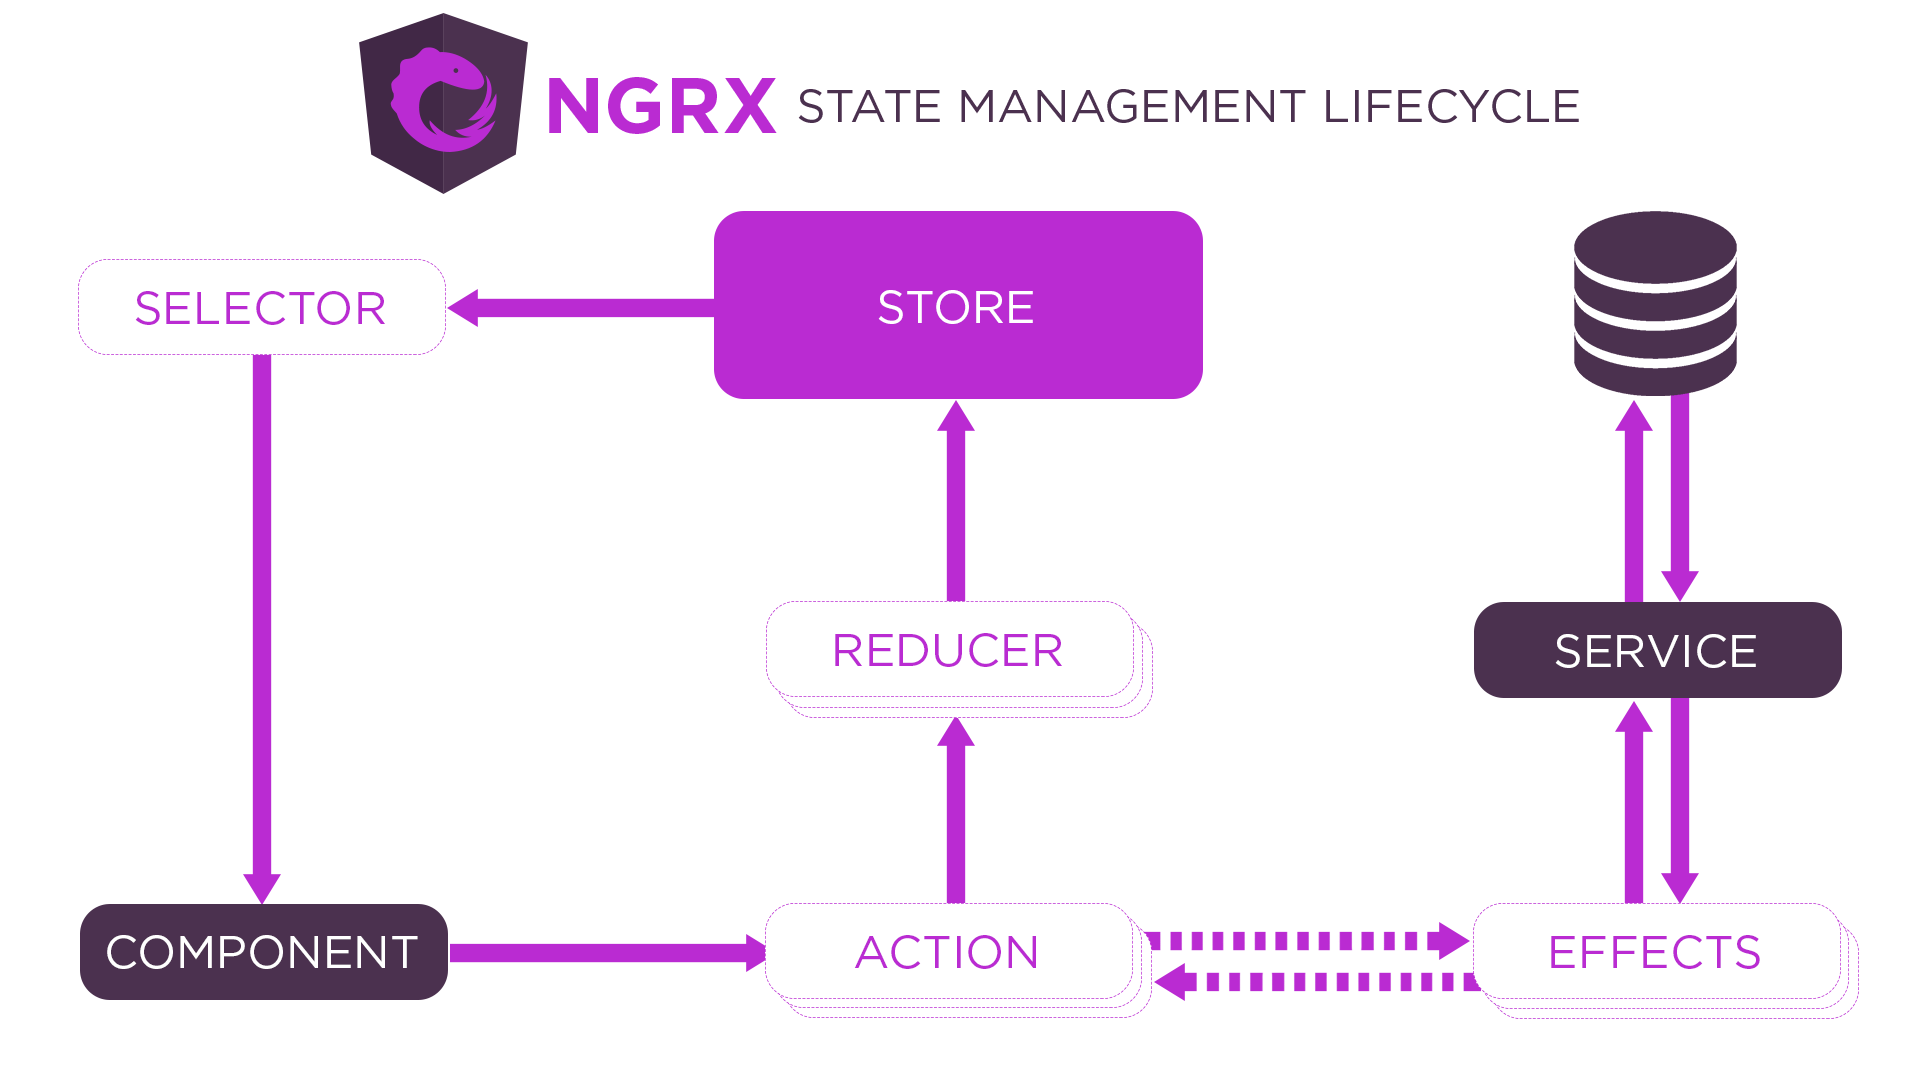
ref: https://ngrx.io/guide/store @2019/12/15
サンプルコードを書いてわかった気になってみる
今回は本家サンプルコードを参考にして書いていきたいと思います。
@ngrx/storeを使わないカウンターアプリの実装
実行環境
     _                      _                 ____ _     ___
    / \   _ __   __ _ _   _| | __ _ _ __     / ___| |   |_ _|
   / △ \ | '_ \ / _` | | | | |/ _` | '__|   | |   | |    | |
  / ___ \| | | | (_| | |_| | | (_| | |      | |___| |___ | |
 /_/   \_\_| |_|\__, |\__,_|_|\__,_|_|       \____|_____|___|
                |___/


Angular CLI: 8.3.14
Node: 10.9.0
OS: darwin x64
Angular:
...

Package                      Version
------------------------------------------------------
@angular-devkit/architect    0.803.14
@angular-devkit/core         8.3.14
@angular-devkit/schematics   8.3.14
@schematics/angular          8.3.14
@schematics/update           0.803.14
rxjs                         6.4.0
プロジェクト作成
ng new ngrx-store-sample? Would you like to add Angular routing? Yes ? Which stylesheet format would you like to use? SCSS [ https://sass-lang.com/ documentation/syntax#scss
コード
import { Component } from '@angular/core';

@Component({
  selector: 'app-counter',
  template: `
    <button (click)="increment()">+</button>
    <button (click)="decrement()">-</button>
    <button (click)="reset()">reset</button>
    <div>Count: {{ count }}</div>
  `,
})
export class CounterComponent {
  count = 0;
  increment() {
    this.count++;
  }

  decrement() {
    this.count--;
  }

  reset() {
    this.count = 0;
  }
}
import { NgModule } from '@angular/core';
import { CommonModule } from '@angular/common';
import { CounterComponent } from './counter.component';

@NgModule({
  declarations: [CounterComponent],
  imports: [CommonModule],
  exports: [CounterComponent]
})
export class CounterModule {}
import { BrowserModule } from '@angular/platform-browser';
import { NgModule } from '@angular/core';
import { AppRoutingModule } from './app-routing.module';
import { AppComponent } from './app.component';
import { CounterModule } from './counter/counter.module';

@NgModule({
  declarations: [
    AppComponent
  ],
  imports: [
    BrowserModule,
    AppRoutingModule,
    CounterModule
  ],
  providers: [],
  bootstrap: [AppComponent]
})
export class AppModule { }
<app-counter></app-counter>
以下のコードを書いたら、
いつものng serveで実行できるはずです。
基本的なカウンターのアプリになります。まだ難しいことはないかと思います。
@ngrx/storeを使ったカウンターアプリの実装
さて、本題の@ngrx/storeを使った実装を行っていきます。
先ほど書いたコードを改造していきます。
最初にライブラリのインストールをします。
npm install @ngrx/{store,store-devtools} --save
Actionの作成
ComponentからReducerを叩く(dispatchする)ためのActionを作成します。
import {createAction} from '@ngrx/store';

enum ACTIONS {
  INCREMENT = '[Counter Component] increment',
  DECREMENT = '[Counter Component] decrement',
  REST = '[Counter Component] reset'
}

export const increment = createAction(ACTIONS.INCREMENT);
export const decrement = createAction(ACTIONS.DECREMENT);
export const reset = createAction(ACTIONS.REST);
ActionはcreateActionというAPIを使って定義をします。
createActionは第一引数にActionの説明、第二引数に引数か関数が定義できます。
第一引数の説明についてはngrxの慣習的に、「[どこでActionを叩くか] Actionの説明」となっております(例: ‘[Counter Component] increment’)
Reducerの作成
Storeの状態を操作するReducerを書きます。
import { createReducer, on } from '@ngrx/store';
import * as CounterActions from './counter.actions';

export const featureName = 'count';
export interface State {
  count: number;
}
export const initialState: State = {
  count: 0,
};

const _counterReducer = createReducer(
  initialState,
  on(CounterActions.increment, state => ({ ...state, count: state.count + 1 })),
  on(CounterActions.decrement, state => ({ ...state, count: state.count - 1 })),
  on(CounterActions.reset, state => ({ ...state, count: 0 }))
);

export function counterReducer(state, action) {
  return _counterReducer(state, action);
}
最初に、Storeに保存する型を定義し、初期状態を定義します。
次にcreateReducerというAPIでReducerを定義します。
createReducerの中身はアロー関数、returnの省略形、スプレッド構文、分割代入などが頻繁に使われるので、TypeScript初学者には理解に時間がかかる部分だと思います(よくいろんな人に質問されます)。特にスプレッド構文に関しては使わない方が稀なので、NGRXを使う方はマスターが必須です。
Selectorの作成
Selectorはstoreの一部を取得したい時などに使われます。今回はstateがcount一つだけですので、
作らなくてもいいのですが、無理やり触れてみたいと思います。
import {createFeatureSelector, createSelector} from '@ngrx/store';
import {State, featureName} from './counter.reducer';

export const selectCounterState = createFeatureSelector<State>(featureName);
export const selectCount = createSelector(selectCounterState, state => state.count);
/**
 * 今回は使用しませんが、stateに副作用をかけることも可能です。
 * 例えば、countの2倍を返すSelector
 */
export const selectCountDouble = createSelector(selectCounterState, state => state.count * 2);
counter moduleの編集
Storeが使えるよう編集します。
StoreはStoreModuleというAPIで定義します。
import { NgModule } from '@angular/core';
import { CommonModule } from '@angular/common';
import { CounterComponent } from './counter.component';
import { StoreModule } from '@ngrx/store';
import { counterReducer, featureName} from './counter.reducer';

@NgModule({
  declarations: [CounterComponent],
  imports: [CommonModule, StoreModule.forRoot({ [featureName]: counterReducer })],
  exports: [CounterComponent]
})
export class CounterModule {}
Componentの編集
import { Component } from '@angular/core';
import { Store, select } from '@ngrx/store';
import {State} from './counter.reducer';
import {selectCount} from './counter.selector';
import * as CounterActions from './counter.actions';

@Component({
  selector: 'app-counter',
  template: `
    <button (click)="increment()">+</button>
    <button (click)="decrement()">-</button>
    <button (click)="reset()">reset</button>
    <div>Count: {{ count$ | async }}</div>
  `,
})
export class CounterComponent {
  count$ = this.store.pipe(select(selectCount));
  increment() {
    this.store.dispatch(CounterActions.increment());
  }

  decrement() {
    this.store.dispatch(CounterActions.decrement());
  }

  reset() {
    this.store.dispatch(CounterActions.reset());
  }
  constructor(private store: Store<State>) {}
}
内部変数で定義していたcountはSelectorから取得します。Selectorから取得したデータは非同期のObservableですので、html側ではasyncパイプを足します。
また、関数はStoreのActionを叩くようにします。
確認
いつもの ng serveで確認すると、先ほどと同じ結果が得られると思います。
次に、@ngrx/store-devtoolsライブラリを使って、デバッガーを開いてみたいと思います。
@ngrx/store-devtoolsを利用するために、Redux DevToolsというブラウザ拡張機能を使用します。
Redux DevToolsは色々なブラウザでサポートされていますが、今回はChromeの拡張機能で検証していきます。
次に@ngrx/store-devtoolsを使用するためにmoduleを編集します。
import { NgModule } from '@angular/core';
import { CommonModule } from '@angular/common';
import { CounterComponent } from './counter.component';
import { StoreModule } from '@ngrx/store';
import { counterReducer, featureName} from './counter.reducer';
import { StoreDevtoolsModule } from '@ngrx/store-devtools';

@NgModule({
  declarations: [CounterComponent],
  imports: [
    CommonModule,
    StoreModule.forRoot({ [featureName]: counterReducer }),
    StoreDevtoolsModule.instrument(),
  ],
  exports: [CounterComponent]
})
export class CounterModule {}
Redux DevToolsで見てみましょう。
Redux DevToolsで見ると、どのActionが叩かれたか、
StoreのStateなど詳細な情報など見ることができます。
(Redux DevToolsは他にも沢山の機能があるので、気になった方は公式のGitHubを見てください。)
今回はサンプルで簡単なコードでしたが、Storeで管理する状態が多く、複雑になると真価が発揮します。
少しコードを足すだけでできるので、NGRXを使用する場合はおすすめします。
NGRXのメリットデメリット
サンプルコードを書いてみて、なんとなく@ngrx/storeがどんなものか理解できたでしょうか?
みなさんも気になるであろうメリットデメリットを記述していこうかと思います。
デメリット
- RxJSとReduxのある程度の理解が必要
- まだまだNGRXに関する情報が少ない
- ただでさえ多いファイル数がよりが多くなる
特にRxJSの理解ですが、NGRXを使用するには必須といえる技術です。
RxJSは適切に使えれば便利なライブラリですが、とても難しいです(私はパズルみたいで大好なライブラリです)。
特に初学者の方は大きな障壁だと思います。私がNGRXを教える時に一番時間がかかるのはRxJSです。基本的なObservableの概念、よく使うoperatorの説明するだけでも大変です。特にPromiseを知らない人は感覚を掴むのが難しい技術だと思います。
プロジェクトでNGRXを利用する際は、メンバーのレベル感をしっかり見定めて導入することが大事だと思います。
メリット
- 強力なデバックツール(Redux dev tools)が使用可能
- Serializability(直列化可能性)
- 機能が分離するためテストが楽になる
- AngularのServiceが増えすぎちゃう問題が解決して、全てStoreに収束する
- Storeに集まっているから、可読性があがる(と思っている)
NGRXを使うと、機能がしっかりわけられ、ComponentはViewのみで、データの更新はStoreに任せることになります。テストはコンポーネントは基本Viewのみで、後はStoreのテストをすればいいことになります。今回は紹介しませんが、StoreMockServiceというStoreのMockを作るAPIもあるので、テストが従来より楽になります。
また、よくも悪くもNGRXはRxJS(Observable)を使用しているので、Serializabilityになります。
RxJSに体が慣れるとPromiseは使いたいと思わない位RxJSは強力なライブラリです。これを機に覚えてみてはいかがでしょうか。
おわりに
なんだかんだで、詳細な部分も紹介した気がします。
この記事の目的はわかった気になってみるですので、読者の皆様がその状態になれたら幸いです。
明日21日目はokawa.mの「②Angular ngrx/entityでよくあるCRUD操作を簡単に書いてみる」です。また私だ!
参考
https://ngrx.io/